🎯 Lab Objective
🎯 Objective
The goal of this part is to transition from hardcoded data to a more flexible data source: a JSON
file. You will learn how to create a JSON file, make your data model Codable, and
write a function to parse the JSON data into Swift objects that your views can use. This
decouples your data from your application logic, making it easier to manage and update in the
future.
🔑 Key Concepts
- JSON (JavaScript Object Notation): A lightweight, human-readable format for data interchange.
- Codable: A Swift protocol that allows objects to be converted to and from an external representation like JSON.
- Bundle: A representation of the code and resources stored in your app's directory. We'll use it to find our JSON file.
- JSONDecoder: A Swift object that decodes instances of a data type from JSON objects.
📄 1. Creating the JSON Data File
Step 1.1: Create contacts.json
Instruction: You have two options to add the contacts.json file to
your project:
- Option 1 (Create New File): In the "Model" folder, create a new file.
Choose the "Empty" template under the "Other" section, name it
contacts.json, and then copy and paste the provided JSON data into this new file. - Option 2 (Drag and Drop): If you already have the
contacts.jsonfile on your computer (e.g., in Finder), you can directly drag and drop it into the "Model" folder in Xcode's Navigator. Make sure to check the "Copy items if needed" (for Xcode 15 and older) or "Copy files to destination" (for Xcode 16 and newer) checkbox when prompted.
Explanation: We are externalizing our data. Instead of being compiled into the
app as Swift code, the data now lives in a separate resource file. This makes it easy to update
the contact list without recompiling the app. Notice how the structure (keys like "name",
"email") matches the properties in our Contact struct.
// Model/contacts.json
[
    {
      "email": "tom.huynh@rmit.edu.vn",
      "id": 1,
      "phone": "091232522",
      "imageName": "tom-huynh",
      "name": "Tom Huynh",
      "coordinates": {
          "latitude": 10.729410965174186,
          "longitude": 106.69522548892152
      }
    },
    {
      "email": "brett.kirk@rmit.edu.vn",
      "id": 2,
      "phone": "094355634",
      "imageName": "brett-kirk",
      "name": "Brett Kirk",
      "coordinates": {
          "latitude": 10.758256325746386,
          "longitude": 106.67228491141948
      }
    },
    // ... and so on for all other contacts
]
🔄 2. Updating the Data Model
Step 2.1: Make the Contact Struct Codable
Instruction: Modify your Contact.swift file. The
Contact struct must conform to the Codable protocol. You'll also need
a nested Coordinates struct to match the JSON structure.
Explanation: Codable is a powerful Swift protocol that enables a
struct or class to be encoded into and decoded from formats like JSON automatically. For this to
work, the property names in your struct must match the keys in the JSON file. We also change
id to Int to match the JSON. Because the JSON has a nested
"coordinates" object, we create a corresponding Coordinates struct, which also must
be Codable.
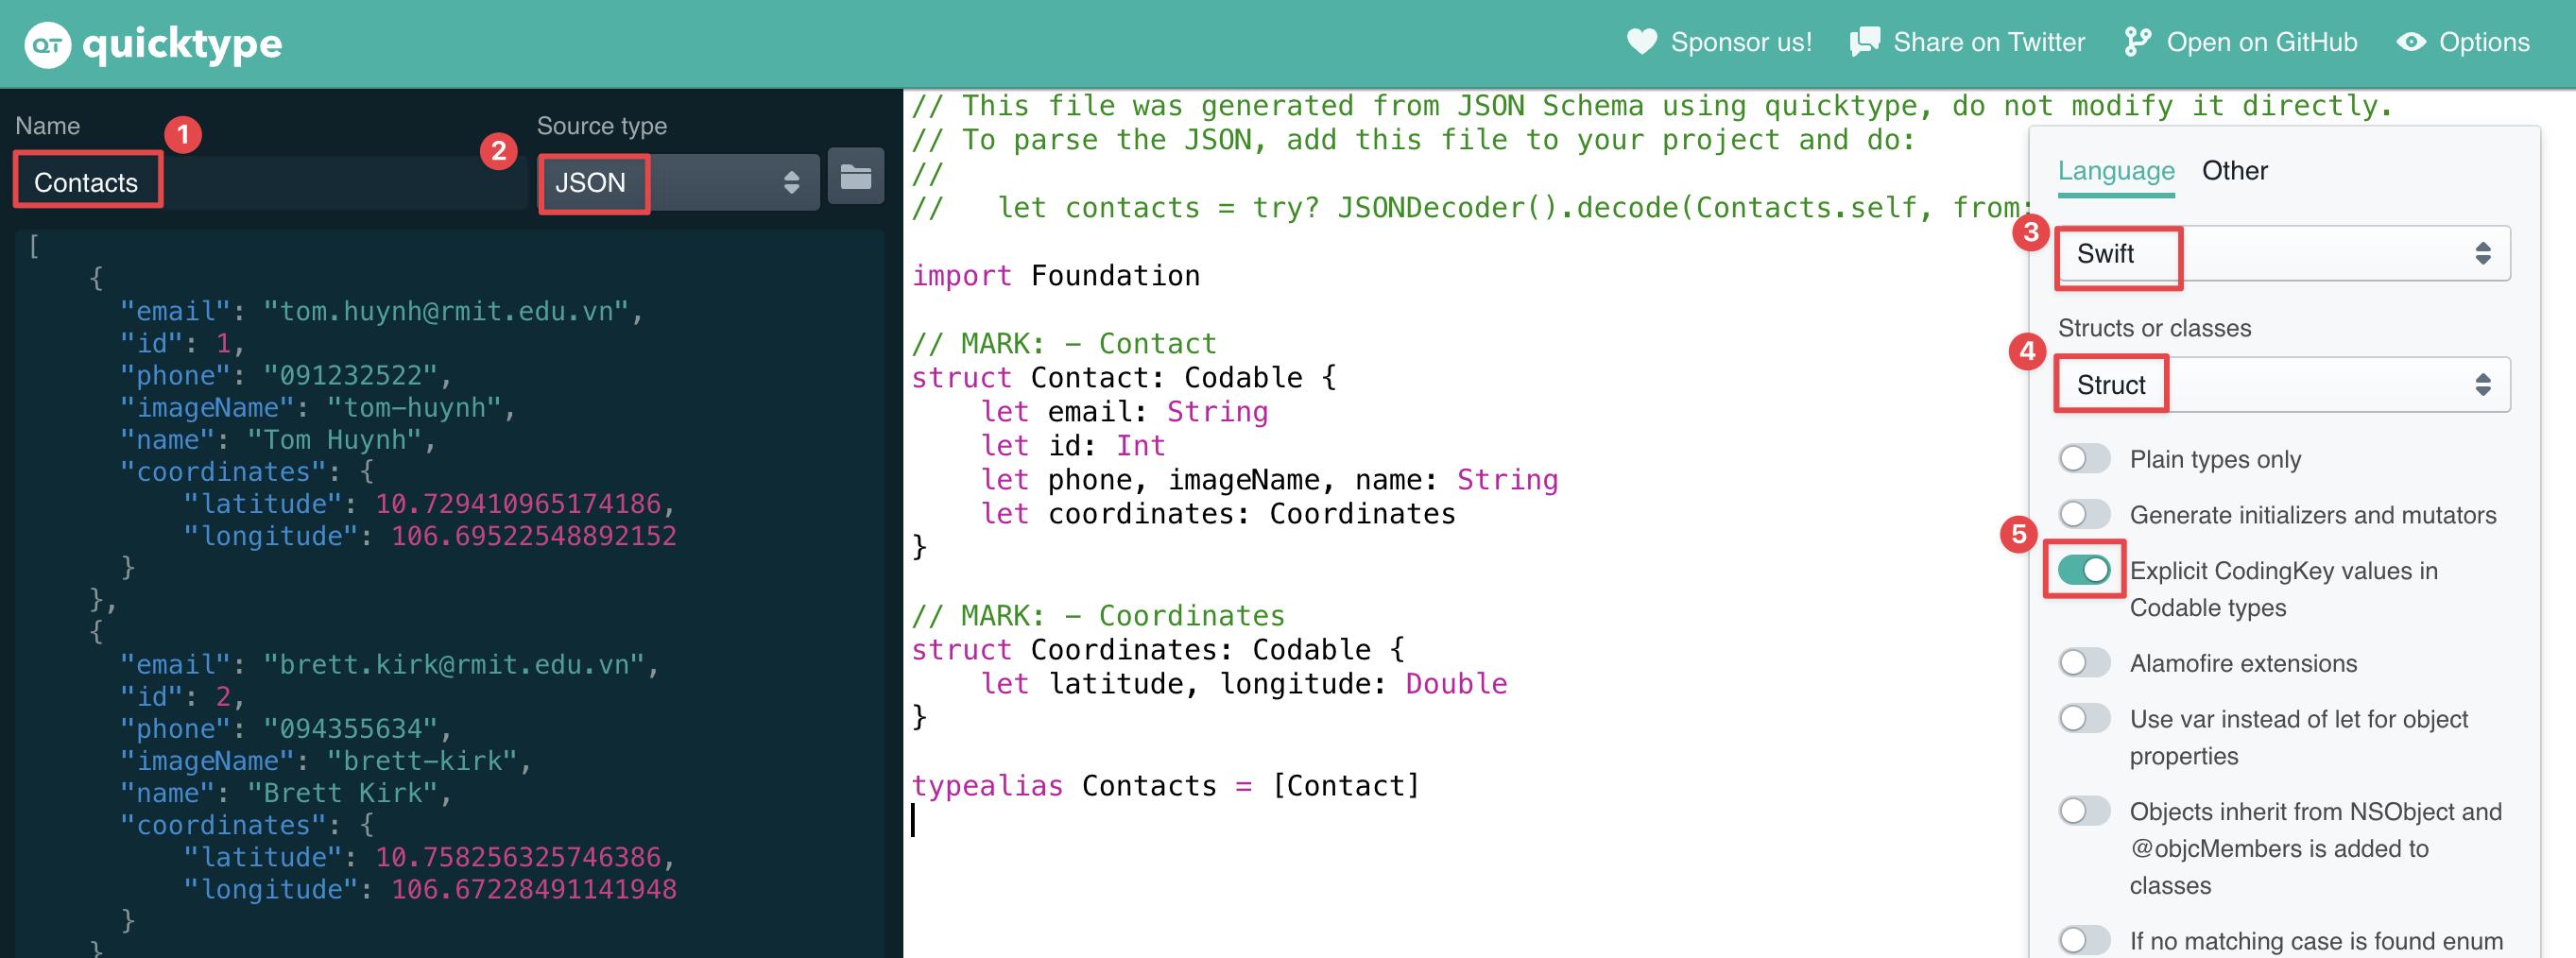
Pro Tip: For complex JSON, writing Codable structs by hand can be
tedious. Tools like QuickType can
instantly generate the necessary Swift structs from a sample JSON, saving you time and
preventing typos.
// Model/Contact.swift
import Foundation
import SwiftUI
import CoreLocation

struct Contact : Identifiable, Codable {
    var id: Int
    var name: String
    var email: String
    var phone: String
    var imageName: String

    var image: Image {
        Image(imageName)
    }

    var coordinates: Coordinates

    // Computed property to expose the CLLocationCoordinate2D, keeping your view code unchanged
    var locationCoordinate: CLLocationCoordinate2D {
        CLLocationCoordinate2D(
            latitude: coordinates.latitude,
            longitude: coordinates.longitude
        )
    }
}

// Nested struct to match the structure of the "coordinates" object in the JSON
struct Coordinates: Codable {
    var latitude: Double
    var longitude: Double
}
📥 3. Loading the Data from JSON
Step 3.1: Update ModelData.swift
Instruction: Replace the hardcoded contacts array in
ModelData.swift with a function that loads and decodes the
contacts.json file.
Explanation: This is the core of our data loading logic. The
decodeJsonFromJsonFile function performs three key steps:
- It gets the URL path to
contacts.jsonwithin the app's bundle. - It tries to load the file's contents into a
Dataobject. - It uses a
JSONDecoderto attempt to convert theDataobject into an array ofContactobjects ([Contact].self).
If any step fails, a fatalError is triggered, which is useful during development to
catch issues immediately. The contacts variable is now initialized with the result
of this function call.
// Model/ModelData.swift
import Foundation
import MapKit

var contacts = decodeJsonFromJsonFile(jsonFileName: "contacts.json")

// How to decode a json file into a struct
func decodeJsonFromJsonFile(jsonFileName: String) -> [Contact] {
    if let file = Bundle.main.url(forResource: jsonFileName, withExtension: nil){
        if let data = try? Data(contentsOf: file) {
            do {
                let decoder = JSONDecoder()
                let decoded = try decoder.decode([Contact].self, from: data)
                return decoded
            } catch let error {
                fatalError("Failed to decode JSON: \(error)")
            }
        }
    } else {
        fatalError("Couldn't load \(jsonFileName) file")
    }
    return [ ] as [Contact]
}
🌐 4. Optional: Loading Data from a URL
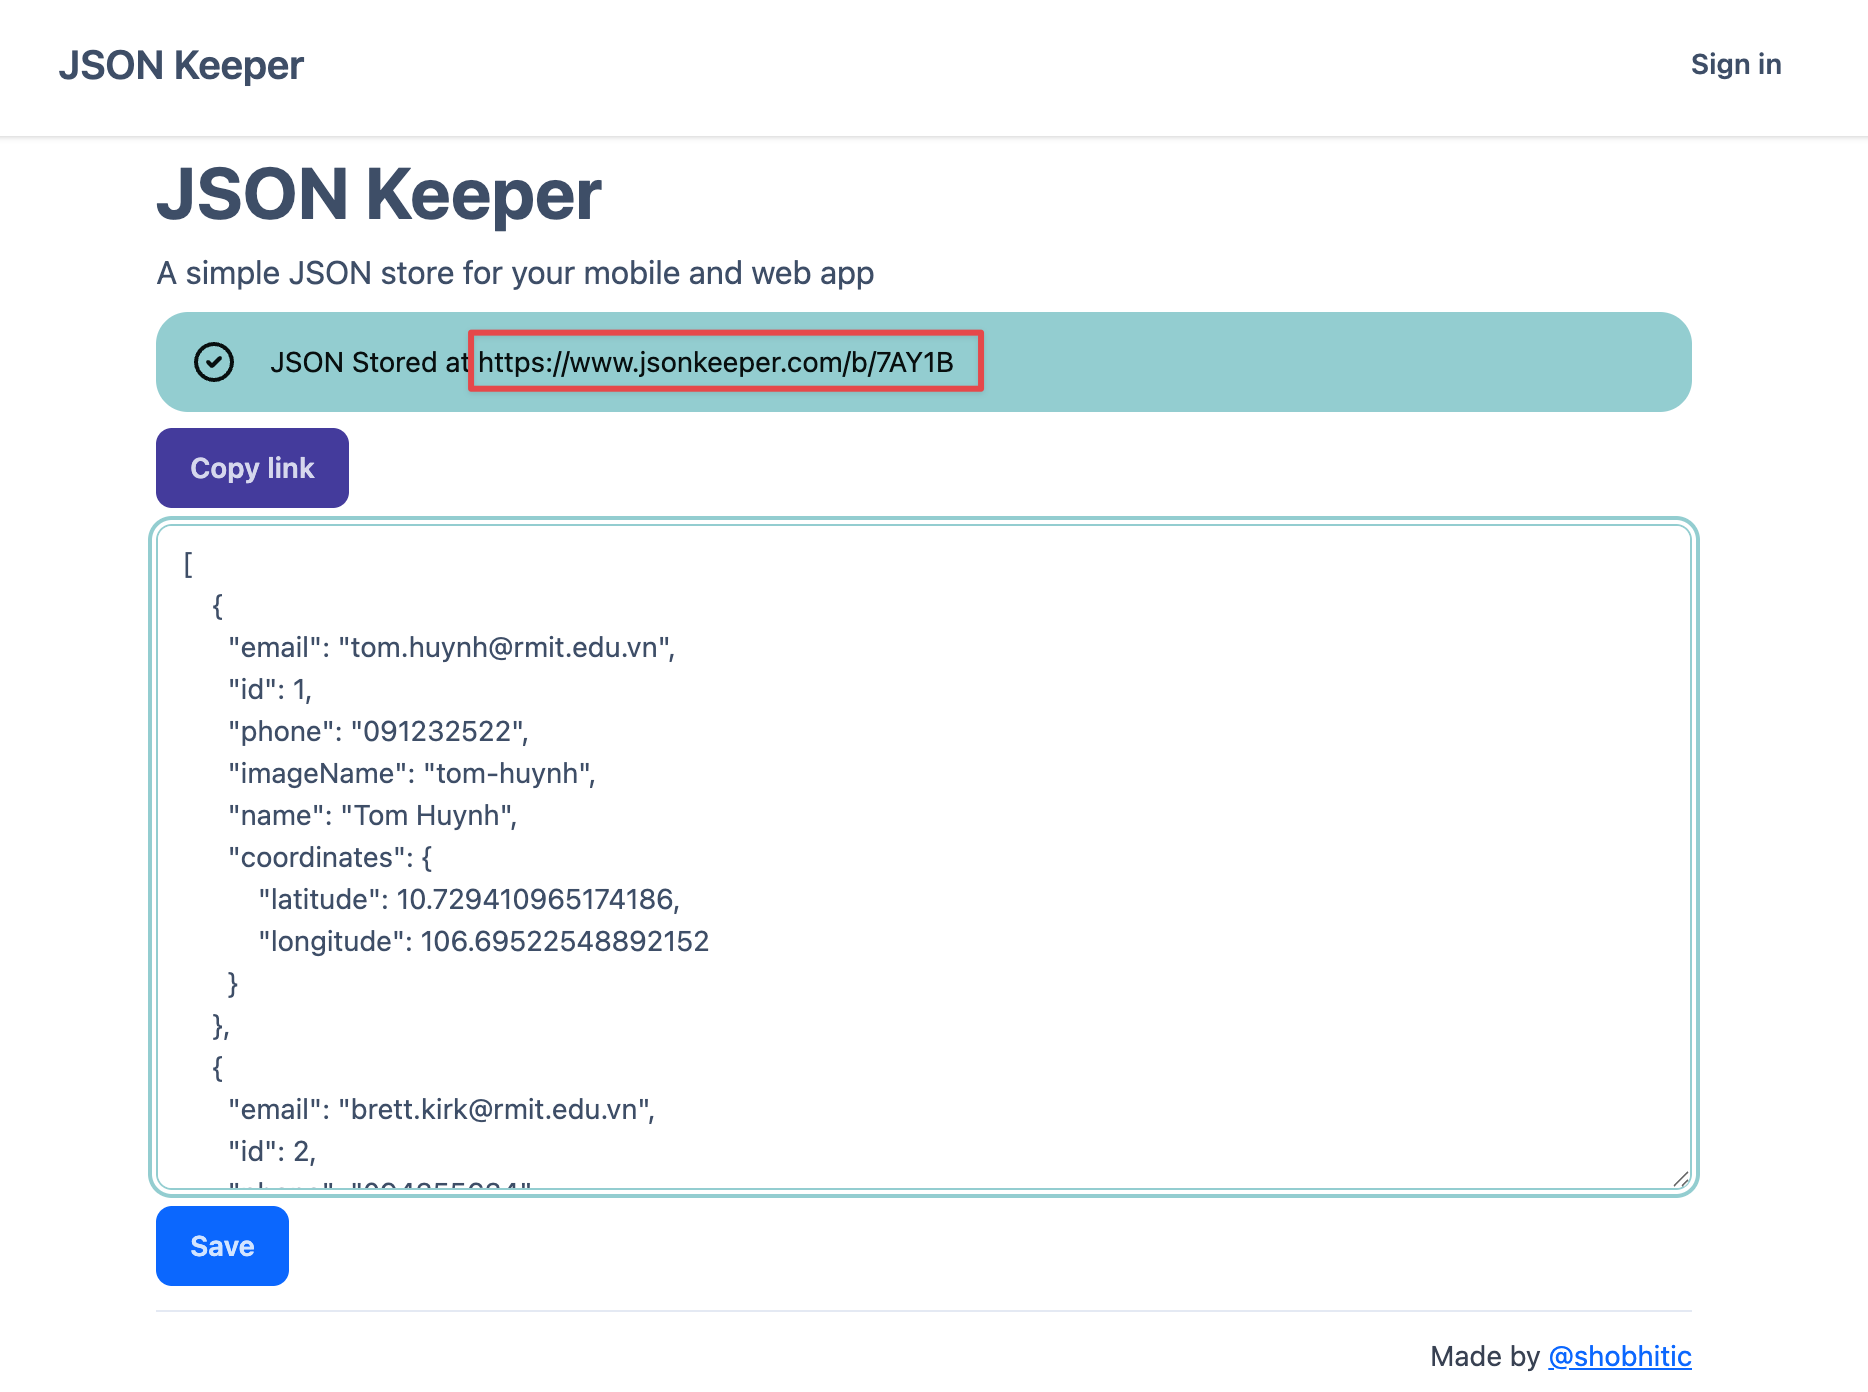
Step 4.1: Host Your JSON with JSON Keeper
Instruction: To fetch data from a URL, you first need to host your JSON file
online. A simple service for this is JSON
Keeper. Copy the entire content of your contacts.json file, paste it into
the text area on the JSON Keeper website, and click "Save". It will provide you with a public
URL that you can use to access your data.
Explanation: JSON Keeper is a free tool that gives you a permanent URL for your JSON data. This is perfect for prototyping and testing network requests without setting up your own server. The URL it generates will serve your JSON content, which your app can then fetch.
Step 4.2: Modify ModelData.swift to Fetch from a URL
Instruction: As an alternative to a local file, you can fetch the JSON data
directly from a web server. Update ModelData.swift to use a URL string and fetch
the data from the network.
Explanation: This modification changes the data source from a local file to a
remote URL. The function now takes a URL string, creates a URL object, and then
uses Data(contentsOf:) to download the data from that URL. The rest of the decoding
process remains the same. This demonstrates the power of abstracting your data source; the
Views don't need to change at all.
Note: The method Data(contentsOf:) performs a
synchronous network request, which means it blocks the app's main thread until
the download is complete. This is simple and acceptable for learning purposes, but in a
real-world application, you should use asynchronous methods (like
URLSession.dataTask with async/await) to prevent freezing the user interface while
data is being fetched.
// Model/ModelData.swift
import Foundation
var jsonURL = "https://www.jsonkeeper.com/b/EBBME"
var contacts = decodeJsonFromJsonFile(inputJsonURL: jsonURL)
func decodeJsonFromJsonFile(inputJsonURL: String) -> [Contact] {
if let url = URL(string: inputJsonURL) {
if let data = try? Data(contentsOf: url) {
do {
let decoder = JSONDecoder()
let decoded = try decoder.decode([Contact].self, from: data)
return decoded
} catch let error {
fatalError("Failed to decode JSON: \(error)")
}
}
}
return [ ] as [Contact]
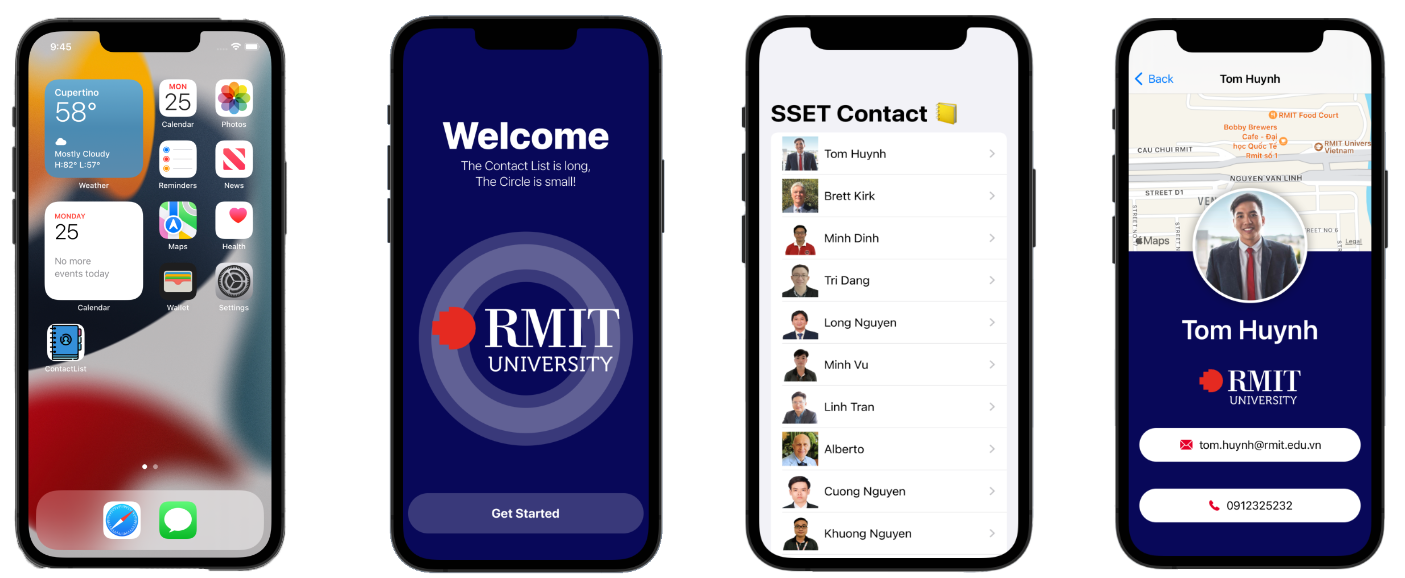
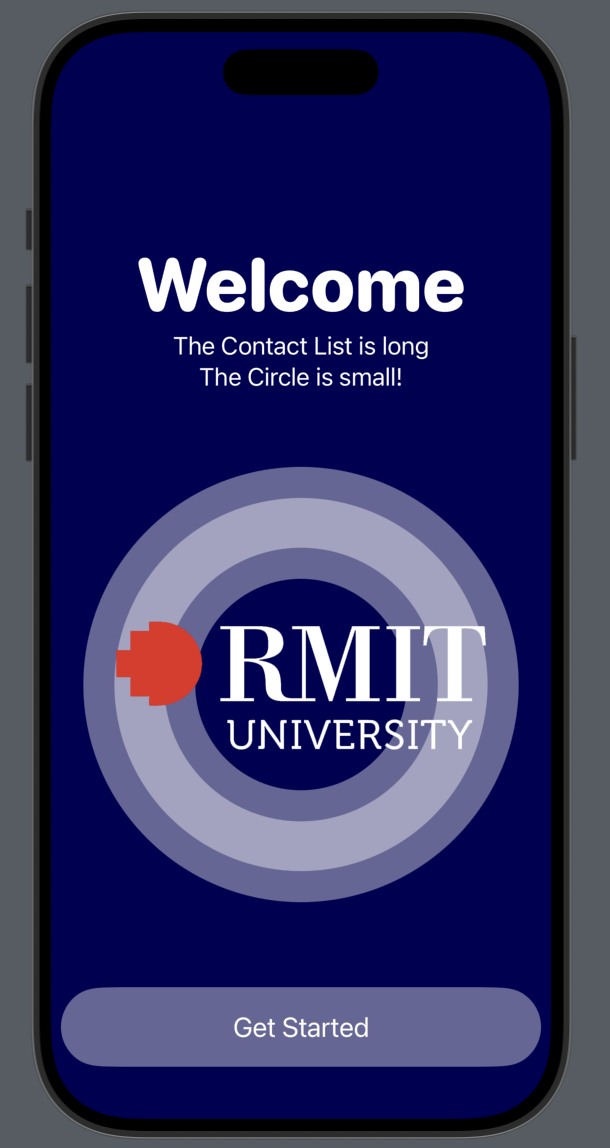
}👋 5. Building a Welcome Screen
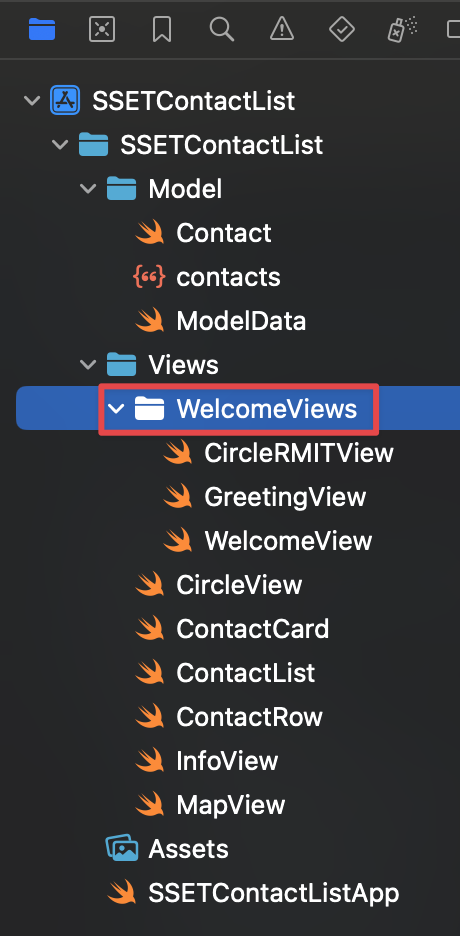
Step 5.1: Organize Your Welcome Views
Instruction: To keep our project tidy, create a new folder inside the
Views folder and name it "WelcomeViews". This is where we'll put all the components
for our new welcome screen.
Explanation: As features become more complex, it's good practice to organize related views into their own folders. This makes the project easier to navigate.
Step 5.2: Create the Decorative Circle View
Instruction: Inside the "WelcomeViews" folder, create a new SwiftUI View file
named CircleRMITView.swift.
Explanation: This is a purely decorative view that creates a visually appealing
element for our welcome screen. It uses a ZStack to layer two stroked circles with
different line widths and opacities, with the RMIT logo placed on top. Breaking down complex
visual elements into smaller views like this is a key SwiftUI pattern.
// Views/WelcomeViews/CircleRMITView.swift
import SwiftUI

struct CircleRMITView: View {
    var body: some View {
        ZStack {
            Circle()
                .stroke(.white.opacity(0.4), lineWidth: 40)
                .frame(width: 260, height: 260, alignment: .center)
            Circle()
                .stroke(.white.opacity(0.4), lineWidth: 90)
                .frame(width: 260, height: 260, alignment: .center)
            Image("rmit-logo-white")
                .resizable()
                .scaledToFit()
                .frame(width: 300)
        }
    }
}

#Preview {
    CircleRMITView()
}

Step 5.3: Create the Greeting View
Instruction: Create another file in "WelcomeViews" folder named
GreetingView.swift. This view will contain the main content of the welcome screen.
Explanation: The GreetingView assembles the text, the
CircleRMITView, and the "Get Started" button. It uses a
@Binding var active: Bool. A binding creates a two-way connection to a state
variable owned by a parent view. When the button in this view is tapped, it changes the value of
active, and this change is communicated back up to the parent view.
// Views/WelcomeViews/GreetingView.swift
import SwiftUI

struct GreetingView: View {
    @Binding var active: Bool

    var body: some View {
        ZStack {
            Color("rmit-blue")
                .edgesIgnoringSafeArea(.all)

            VStack {
                Spacer()
                Text("Welcome")
                    .font(.system(size: 60, weight: .heavy, design: .rounded))
                    .foregroundColor(.white)
                Text("""
                    The Contact List is long
                    The Circle is small!
                    """)
                .font(.title3)
                .foregroundColor(.white)
                .multilineTextAlignment(.center)

                Spacer()

                CircleRMITView()

                Spacer()

                Button(action: {
                    active = false
                }, label: {
                    Capsule()
                        .fill(.white.opacity(0.4))
                        .padding(8)
                        .frame(height: 80)
                        .overlay(
                            Text("Get Started")
                                .font(.title2)
                                .foregroundColor(.white)
                        )
                })
            }
        }
    }
}

#Preview {
    GreetingView(active: .constant(true))
}
Step 5.4: Create the Main Welcome View (State Holder)
Instruction: Create the final view for this feature,
WelcomeView.swift, also in the "WelcomeViews" folder.
Explanation: This view acts as the container and state manager. It holds the
"source of truth" for whether the welcome screen is active using
@State var isWelcomeActive: Bool = true. It then uses an if statement
to show either the GreetingView or the ContactList. It passes the
isWelcomeActive state down to the GreetingView as a binding
($isWelcomeActive), allowing the child view to modify the parent's state.
// Views/WelcomeViews/WelcomeView.swift
import SwiftUI

struct WelcomeView: View {
    @State var isWelcomeActive: Bool = true

    var body: some View {
        ZStack {
            if isWelcomeActive {
                // Display welcome screen
                GreetingView(active: $isWelcomeActive)

            } else {
                // Display Contact list screen
                ContactList()
            }
        }
    }
}

#Preview {
    WelcomeView()
}
Step 5.5: Update the App Entry Point
Instruction: Finally, update SSETContactListApp.swift to make
WelcomeView the root view of the app.
Explanation: With our state management now neatly encapsulated inside
WelcomeView, the app's entry point becomes very simple. We just need to create an
instance of WelcomeView, and it will handle its own logic for displaying the
greeting or the contact list.
// SSETContactListApp.swift
import SwiftUI

@main
struct SSETContactListApp: App {
    var body: some Scene {
        WindowGroup {
            WelcomeView()
        }
    }
}
✨ 6. Final Polish & Deployment
✅ Finishing Checklist
Before considering the project complete, run through this checklist:
- Polished Views: Ensure all your views have consistent padding, fonts, and colors. The UI should look clean and intentional.
- App Icon: Verify that your custom app icon is correctly configured in
Assets.xcassetsand appears on the device or simulator. - Image Assets: Check that all images in your asset catalog have their 1x, 2x, and 3x variants to look sharp on all devices.
- Physical Device Deployment: Deploy and test the app on an actual iPhone. This is the best way to check for performance issues and see how the app truly feels.
🏆 7. Bonus Challenge: Build an App with a Public API
⚔️ A Wild Challenge Has Appeared!
Ready to apply your skills to a new project? The goal of this challenge is to build a simple but polished app from scratch that fetches and displays data from a free, public API.
- Find an API: Choose an interesting API from a curated list like this one: List of Free Public APIs. Topics range from crypto and food to movies and anime.
- Analyze the JSON: Once you have an API endpoint, look at the JSON it returns. If it's complex, use a tool like JSON Beautifier to make it more readable.
- Build the App:
- Create the
Codablestructs for the JSON data (use QuickType!). - Design a list view to show the items and a detail view for more information.
- Polish the UI and deploy it to your phone!
- Create the
Some APIs can have complex JSON structures that are challenging to parse. Before tackling a big one, it's a great idea to start with something simpler. Here are a few fun, easy-to-use APIs with very simple JSON responses:
- The Cat Fact API: Get random cat facts. URL: https://catfact.ninja/fact
- The Dog API: Get a random dog image. URL: https://dog.ceo/api/breeds/image/random
- PokéAPI: Get data about Pokémon. Let's start with Ditto! URL: https://pokeapi.co/api/v2/pokemon/ditto
- Chuck Norris Jokes API: Get a random Chuck Norris joke. URL: https://api.chucknorris.io/jokes/random
- Genderize.io API: Predict the gender of a name. URL: https://api.genderize.io?name=peter
- The Yes/No API: Get a "yes" or "no" with a GIF. URL: https://yesno.wtf/api
Example Idea: Once you're comfortable, a great but more challenging place to start is the Jikan API, a free and well-documented REST API for anime information. Be aware that its JSON structure is more complex, which makes it a good exercise in parsing nested data. For the example app shown, it uses the endpoint https://api.jikan.moe/v4/top/anime to fetch the top anime. You can read the documentation for this specific endpoint here to understand the structure of the JSON response. You could build an app that shows a categorized list of top anime, similar to the demo shown in the lecture.
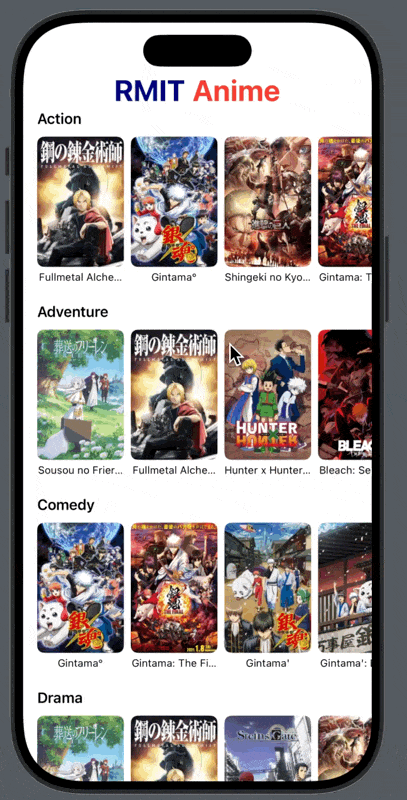
💡 Hint: Getting Started with the RMIT Anime App
Here is some starter code to begin your RMIT Anime app. This code will help you decode the
Anime struct from the Jikan API endpoint, focusing on retrieving the anime
title and its synopsis.
Project Folder Structure
CodableTesting
├── Model
│   ├── Anime.swift
│   └── ModelData.swift
├── RMITAnime.swift
└── Views
    └── AnimeList.swift
File: Model/Anime.swift
import Foundation

// This struct corresponds to the top-level JSON object from the API.
struct AnimeResponse: Codable {
    let data: [Anime]
}

// This struct represents a single anime object from the "data" array.
// It conforms to Codable to be decodable from JSON.
// It conforms to Identifiable so SwiftUI's List can uniquely identify each row.
struct Anime: Codable, Identifiable {
    let mal_id: Int
    let title: String

    // The description of the anime
    let synopsis: String

    // We use mal_id as the unique ID required by the Identifiable protocol.
    var id: Int {
        return mal_id
    }
}
File: Model/ModelData.swift
import Foundation

var jsonURL = "https://api.jikan.moe/v4/top/anime"

func decodeJsonFromURL(inputJsonURL: String) -> AnimeResponse {
    if let url = URL(string: inputJsonURL) {
        if let data = try? Data(contentsOf: url) {
            do {
                let decoder = JSONDecoder()
                let decoded = try decoder.decode(AnimeResponse.self, from: data)
                return decoded
            } catch let error {
                fatalError("Failed to decode JSON: \(error)")
            }
        }
    }
    return AnimeResponse(data: [])
}

var myAnime = decodeJsonFromURL(inputJsonURL: jsonURL)
File: RMITAnime.swift
import SwiftUI

@main
struct RMITAnime: App {
    var body: some Scene {
        WindowGroup {
            AnimeList()
        }
    }
}
File: Views/AnimeList.swift
import SwiftUI

struct AnimeList: View {

    var body: some View {
        NavigationView {
            List(myAnime.data) { anime in
                NavigationLink {
                    VStack(alignment: .leading, spacing: 10) {
                        Text(anime.title)
                            .font(.title)
                            .bold()

                        Text(anime.synopsis)
                            .font(.body)
                            .foregroundColor(.secondary)
                    }
                    .padding()
                    .navigationTitle("Details")
                } label: {
                    Text(anime.title)
                }
            }
            .navigationTitle("Top Anime")
        }
        .onAppear {
            // A tip to debugging using print statements right inside the view
            print("All Anime:")
            print(myAnime)
        }
    }
}

#Preview {
    AnimeList()
}
🎉 Conclusion & Next Steps
🥳 Congratulations!
You have successfully refactored your app to load data from a JSON file. This is a significant
improvement that makes your project more scalable and maintainable. The best part is that you
didn't have to change a single line of code in your Views! Because the data model
(contacts array) is still available and its properties are the same, the UI works
exactly as it did before.
🚀 What's Next?
From here, you can explore more advanced topics:
- Fetching data from a remote API: Instead of a local JSON file, load data from a web server.
- State Management: Use
@StateObjectand@ObservedObjectto create a more robust data flow. - User Input: Add forms to allow users to add or edit contacts.