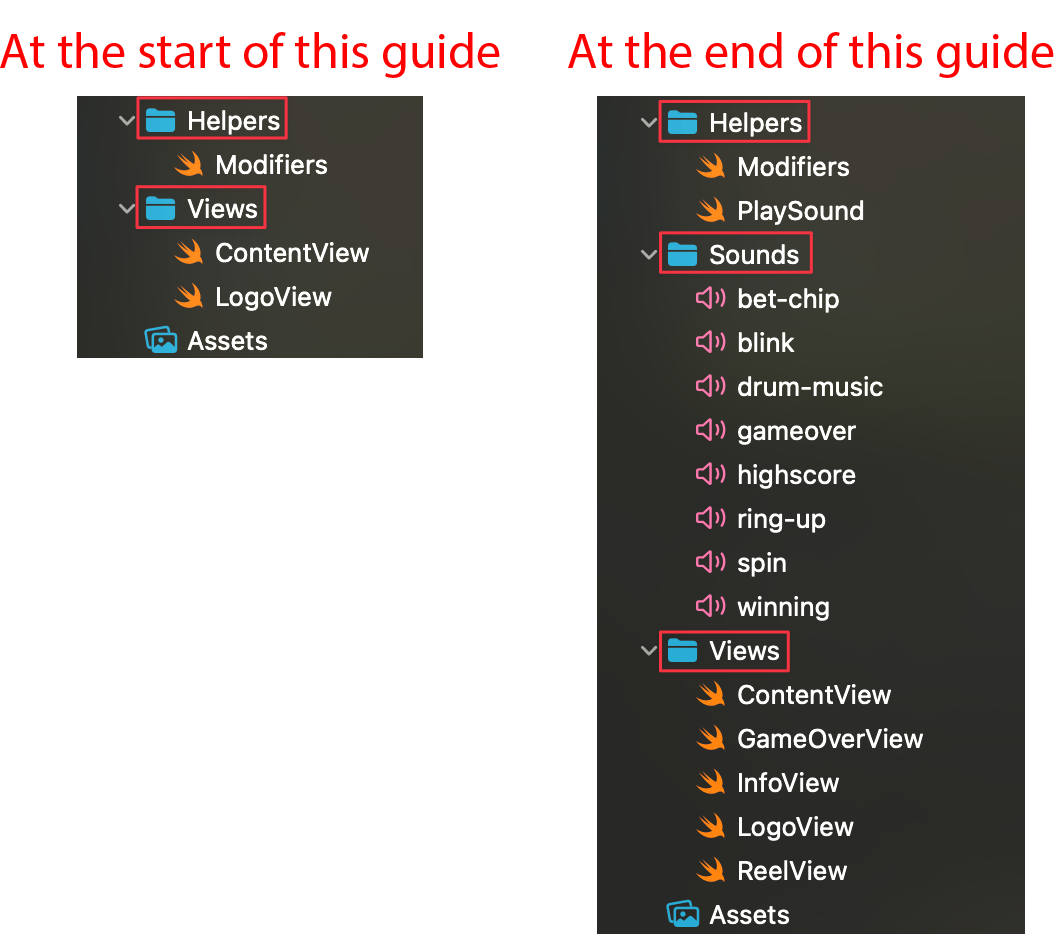
🚀 A Note on Folder Structure
Before we begin, the target project has a more organized folder structure. As you create new
files in the following steps, you will also create new folders (Views,
Helpers, Sounds) to place them in. You will also move existing files
into these new folders to match the final structure.
⚙️ Step 1: Refactor the Spin Logic with map
Refactor the Spin Logic with map
Instruction:
Modify the spinReels function in ContentView.swift. Instead of
updating each element of the reels array individually, use the map
higher-order function for a more concise and modern Swift approach.
Explanation:
The map function creates a new array by transforming each element of the original
array. Here, we're transforming each element (represented by _ since we don't need
its old value) into a new random integer. This is cleaner and more efficient than accessing each
array index one by one.
// ContentView.swift
import SwiftUI

struct ContentView: View {
    let icons = ["apple","bar","cherry","clover","diamond", "grape", "heart", "horseshoe","lemon","melon","money","orange"]

    @State private var reels = [6, 3, 1]

    func spinReels() {
        // MODIFY THIS FUNCTION
        reels = reels.map({ _ in
            Int.random(in: 0...icons.count - 1)
        })
    }

    var body: some View {
        // ... rest of the body remains the same
    }
}
📊 Step 2: Add State Variables for Game Data
Add State Variables for Game Data
Instruction:
In ContentView.swift, declare new @State variables to manage the
player's coins, the current bet amount, and the high score. Initialize them with starting
values.
Explanation:
@State is a property wrapper that allows us to store and modify values that affect
the UI. When a @State variable changes, SwiftUI automatically re-renders the parts
of the view that depend on it. We'll use these to make our scoreboards and game logic dynamic.
// ContentView.swift
struct ContentView: View {
let icons = ["apple","bar","cherry","clover","diamond", "grape", "heart", "horseshoe","lemon","melon","money","orange"]
@State private var reels = [6, 3, 1]
// ADD THESE STATE VARIABLES
@State var coins = 100
@State var betAmount = 10
@State var highscore = 0
func spinReels() {
// ...
}
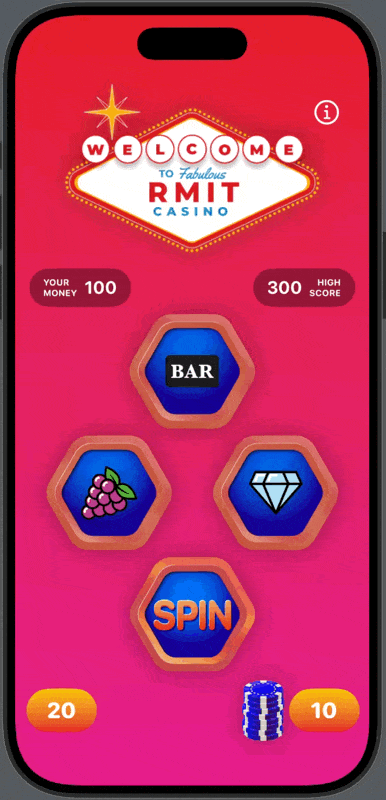
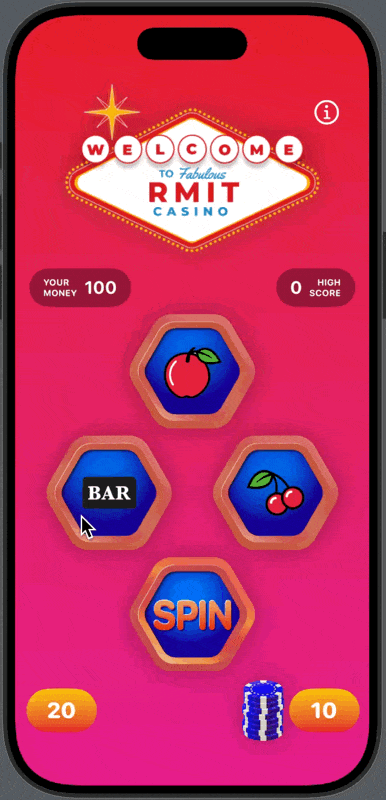
}🔗 Step 3: Display Dynamic Game Data
Connect State Variables to the UI
Instruction:
In ContentView.swift, find the two scoreboards in the body. Replace
the hardcoded text values ("100" and "500") with the new state
variables coins and highscore using string interpolation.
Explanation:
Now the text views will display the current values of our state variables. We use string
interpolation \() to embed the integer values from our variables directly into the
Text views. Whenever coins or highscore changes, the UI
will update automatically.
// ContentView.swift
// ...
                // MARK: - Score boards
                HStack {
                    HStack {
                        Text("Your\nMoney".uppercased())
                            .multilineTextAlignment(.leading)
                            .modifier(scoreLabelStyle())

                        // MODIFY THIS LINE
                        Text("\(coins)")
                            .modifier(scoreNumberStyle())
                    }
                    .modifier(scoreCapsuleStyle())

                    Spacer()

                    HStack {
                        // MODIFY THIS LINE
                        Text("\(highscore)")
                            .modifier(scoreNumberStyle())

                        Text("High\nScore".uppercased())
                            .multilineTextAlignment(.trailing)
                            .foregroundStyle(Color.colorWhiteRMIT)
                            .modifier(scoreLabelStyle())

                    }
                    .modifier(scoreCapsuleStyle())
                }
// ...
🧠 Step 4: Implement Core Game Logic
Implement Core Game Logic
Instruction:
- Add three new functions to
ContentView.swift:playerWins(),playerLoses(), andcheckWinning(). - Call
checkWinning()from the spin button's action afterspinReels().
Explanation:
playerWins(): Increases the player'scoinsby 10 times thebetAmount.playerLoses(): Decreases the player'scoinsby thebetAmount.checkWinning(): This is the core logic that checks if all three reels show the same icon. If they do, it callsplayerWins(); otherwise, it callsplayerLoses(). We call this function every time the reels are spun to determine the outcome.
// ContentView.swift
// ...
    func spinReels() {
        reels = reels.map({ _ in
            Int.random(in: 0...icons.count - 1)
        })
    }

    // ADD THESE FUNCTIONS
    // MARK: - Check Winning Logic
    func checkWinning() {
        if reels[0] == reels [1] && reels[1] == reels [2] {
            // Winning logic
            playerWins()
        } else {
            // Losing logic
            playerLoses()
        }
    }

    // MARK: - Player Winning Logic
    func playerWins() {
        coins += betAmount*10
    }

    // MARK: - Player Lose Logic
    func playerLoses(){
        coins -= betAmount
    }

    var body: some View {
// ...
                    // MARK: - Spin Button
                    Button {
                        spinReels()
                        // ADD THIS LINE
                        checkWinning()
                    } label: {
// ...
🏆 Step 5: Implement High Score Logic
Implement High Score Logic
Instruction:
- Create a new function
newHighScore(). - Update the
checkWinning()function to check if the new coin total is a new high score and callnewHighScore()if it is.
Explanation:
After a player wins, we need to check if their new coin total is greater than the current high
score. If it is, the newHighScore() function updates the highscore
variable. This ensures we are always tracking the best score achieved in the current session.
// ContentView.swift
// ...
    // MARK: - Check Winning Logic
    func checkWinning() {
        if reels[0] == reels [1] && reels[1] == reels [2] {
            // Winning logic
            playerWins()

            // ADD THIS LOGIC
            if coins > highscore {
                newHighScore()
            }

        } else {
            // Losing logic
            playerLoses()
        }
    }

    // MARK: - Player Winning Logic
    func playerWins() {
        coins += betAmount*10
    }

    // ADD THIS FUNCTION
    // MARK: - Highscore Logic
    func newHighScore() {
        highscore = coins
    }

    // MARK: - Player Lose Logic
// ...
💰 Step 6: Add State for Bet Selection
Add State for Bet Selection
Instruction:
In ContentView.swift, add two new boolean @State variables,
isChooseBet10 and isChooseBet20, to track which bet amount is
currently active. Initialize isChooseBet10 to true.
Explanation: These boolean flags will help us manage the UI for the bet selection. We can use them to show or hide the casino chip image next to the selected bet amount, providing clear visual feedback to the player about their current bet.
// ContentView.swift
// ...
    @State var betAmount = 10
    @State var highscore = 0

    // ADD THESE STATE VARIABLES
    @State var isChooseBet10 = true
    @State var isChooseBet20 = false

    func spinReels() {
// ...
👆 Step 7: Implement Betting Functionality
Implement Betting Functionality
Instruction:
- Create two new functions,
chooseBet10()andchooseBet20(). - In the
body, update the footer UI to wrap the bet amounts inButtons that call these functions. - Use the
isChooseBet10andisChooseBet20state variables to control the opacity of the casino chip images.
Explanation:
- The
chooseBet10()andchooseBet20()functions will update thebetAmountand toggle the boolean flags. - We will replace the static
TextandImageviews in the footer with interactiveButtons. - The
.opacity()modifier on the casino chipImagewill now be controlled by our state variables, making the chip appear only for the active bet.
// ContentView.swift
// ...
    func playerLoses(){
        coins -= betAmount
    }

    // ADD THESE FUNCTIONS
    // MARK: - Bet 20 Logic
    func chooseBet20(){
        betAmount=20
        isChooseBet10=false
        isChooseBet20=true
    }
    // MARK: - Bet 10 Logic
    func chooseBet10(){
        betAmount=10
        isChooseBet10=true
        isChooseBet20=false
    }

    var body: some View {
// ...
                // MARK: - Footer
                // MODIFY THE ENTIRE FOOTER HSTACK
                HStack {
                    // MARK: - Bet 10
                    Button(action: {
                        chooseBet10()
                    }, label: {
                        HStack (spacing: 30) {
                            Text("10")
                                .modifier(betCapsuleStyle())

                            Image("casino-chips")
                                .resizable()
                                .modifier(casinoChipStyle())
                                .opacity(isChooseBet10 ? 1 : 0)
                        }
                    })

                    Spacer()

                    // MARK: - Bet 20
                    Button(action: {
                        chooseBet20()
                    }, label: {
                        HStack (spacing: 30) {
                            Image("casino-chips")
                                .resizable()
                                .modifier(casinoChipStyle())
                                .opacity(isChooseBet20 ? 1 : 0)

                            Text("20")
                                .modifier(betCapsuleStyle())
                        }
                    })
                }
                .padding(.horizontal, 20)
// ...
💾 Step 8: Persist High Score with AppStorage
Persist High Score with AppStorage
Instruction:
In ContentView.swift, change the @State property wrapper for the
highscore variable to @AppStorage("highscore").
Explanation:
@AppStorage is a property wrapper that automatically saves and loads a value from
the device's UserDefaults. By using @AppStorage("highscore"), we are
telling SwiftUI to store the highscore value under the key "highscore". This makes
the high score persist even after the user closes and reopens the app.
// ContentView.swift
// ...
    @State private var reels = [0,1,2]
    @State var coins = 100
    @State var betAmount = 10
    // MODIFY THIS LINE
    @AppStorage("highscore") var highscore = 0

    @State var isChooseBet10 = true
// ...
🎬 Step 9: Implement Reel Animation
How Animation Works in This Project (Conceptual Overview)
The animation in this project is centered around the slot machine reels. The goal is to create a visual effect that simulates the reels "spinning" and landing on new symbols when the user presses the spin button.
The project achieves this using SwiftUI's declarative animation system. Instead of manually defining each frame of the animation, we define two distinct visual states for the reel icons and tell SwiftUI how to transition between them.
Here's the core concept:
- State-Driven UI: The appearance of the reel icons (their position and
visibility) is directly tied to a single state variable,
animatingIcon, which is a boolean (trueorfalse).- State 1 (
animatingIconistrue): The icon is fully visible (opacity: 1) and in its final position (offset: 0). This is the "at rest" state. - State 2 (
animatingIconisfalse): The icon is invisible (opacity: 0) and moved upwards (offset: -50). This is the "spinning" or "hidden" state.
- State 1 (
- Triggering the Animation: When the user taps the "Spin" button, the code
doesn't directly move the images. Instead, it rapidly changes the
animatingIconstate variable inside specialwithAnimationblocks. - The Animation Sequence:
- Phase 1 (Disappear): The
animatingIconstate is changed fromtruetofalse. SwiftUI automatically animates the transition, causing the icons to slide up and fade out. At the same time, the underlying data for the reels is changed to new random symbols. - Phase 2 (Reappear): After a short delay, the
animatingIconstate is changed back fromfalsetotrue. SwiftUI animates this transition as well. Since the underlying data has already changed, the *new* icons slide down from above and fade in, completing the "spin" effect.
- Phase 1 (Disappear): The
This approach is powerful because it separates the animation logic (the
withAnimation blocks) from the view's appearance (defined in
ReelView). The view only needs to know how to draw itself for a given state, and
SwiftUI handles the rest.
9.1: Add Animation State
Instruction:
Add a new @State boolean variable animatingIcon to
ContentView.swift and initialize it to true.
Explanation:
This state variable is the master switch for our animation. Its initial value is
true so the icons are visible when the app launches. All three
ReelView instances will be linked to this single variable, ensuring they animate in
perfect sync.
// ContentView.swift
// ...
    @State var isChooseBet10 = true
    @State var isChooseBet20 = false

    // ADD THIS STATE
    @State var animatingIcon = true

    // MARK: - Spin Logic
// ...
9.2: Create a Reusable `ReelView`
Instruction:
- In Xcode, create a new group (folder) named
Views. - Move
ContentView.swift,LogoView.swift, andRMITCasinoLiveCodeApp.swiftinto this newViewsfolder. - Inside the
Viewsfolder, create a new SwiftUI View file namedReelView.swift. - Copy the
ZStackcode for a single reel fromContentViewinto this new file and adapt it to use properties.
Explanation:
Extracting UI components into their own views is a fundamental practice in SwiftUI. It makes our
code cleaner, more organized, and reusable. The ReelView is designed to be a
self-contained component responsible for displaying one reel background and one symbol icon. It
accepts two parameters: the reelIcon (the name of the image to display) and
animatingIcon (the boolean that controls the animation state).
// Create new file Views/ReelView.swift
import SwiftUI

struct ReelView: View {
    var reelIcon: String
    var animatingIcon: Bool
    var body: some View {
        ZStack {
            Image("reel")
                .resizable()
                .modifier(reelImageStyle())
            Image(reelIcon)
                .resizable()
                .modifier(iconImageStyle())
        }
    }
}

#Preview {
    ReelView(reelIcon: "apple", animatingIcon: true)
}
9.3: Add Animation Modifiers to `ReelView`
Instruction:
In ReelView.swift, add .opacity() and .offset() modifiers
to the icon Image. These modifiers will be controlled by the
animatingIcon property passed into the view.
Explanation:
These two conditional modifiers are the heart of the visual effect. They directly link the
view's appearance to the animatingIcon state.
.opacity(animatingIcon ? 1 : 0): This is a ternary operator that reads: "IfanimatingIconis true, set opacity to 1 (visible). Otherwise, set it to 0 (invisible).".offset(y: animatingIcon ? 0 : -50): Similarly, this reads: "IfanimatingIconis true, keep the vertical offset at 0. Otherwise, move the icon up by 50 points."
// Views/ReelView.swift
// ...
            Image(reelIcon)
                .resizable()
                .modifier(iconImageStyle())
                // ADD THESE MODIFIERS
                .opacity(animatingIcon ? 1 : 0)
                .offset(y: animatingIcon ? 0 : -50)
        }
    }
}
// ...
9.4: Use `ReelView` in `ContentView`
Instruction:
In ContentView.swift, remove the old ZStack code for the three reels
and replace them with three instances of your new ReelView.
Explanation:
Our ContentView is now much cleaner. We are composing our UI from smaller,
specialized views. We pass the correct icon name from our reels array and the
single animatingIcon state to each ReelView instance. This ensures
that all three reels are linked to the same animation trigger and will always animate together.
// ContentView.swift
// ...
                // MARK: - Slot Machine
                VStack {
                    // REMOVE THE OLD REEL ZSTACKS AND REPLACE WITH THIS

                    // MARK: - First Reel
                    ReelView(reelIcon: icons[reels[0]], animatingIcon: animatingIcon)

                    HStack {
                        // MARK: - Second Reel
                        ReelView(reelIcon: icons[reels[1]], animatingIcon: animatingIcon)

                        Spacer()

                        // MARK: - Third Reel
                        ReelView(reelIcon: icons[reels[2]], animatingIcon: animatingIcon)
                    }

                    // MARK: - Spin Button
                    Button {
// ...
9.5: Trigger Animation on Spin
Instruction:
In ContentView.swift, wrap the logic inside the Spin Button's action
with withAnimation blocks.
Explanation:
This is the final and most crucial step. The "Spin" button's action is where the state is
changed in a carefully timed sequence using withAnimation blocks.
- Phase 1 (Icons Disappear): The first state change is wrapped in
withAnimation(Animation.easeOut(duration: 0.3)). Inside this block,animatingIconis set tofalse. This tells SwiftUI to animate the change fromtruetofalseover 0.3 seconds, causing all threeReelViewicons to slide up and fade out. ThespinReels()function is called within the same block, which updates thereelsarray with new random symbols *while the icons are invisible*. - Phase 2 (New Icons Appear): The second state change is wrapped in
withAnimation(Animation.easeOut(duration: 0.7).delay(0.3)). The.delay(0.3)is critical; it ensures this animation starts only after the first one has finished. Inside this block,animatingIconis set back totrue. SwiftUI animates the change fromfalsetotrueover 0.7 seconds. Because thereelsdata has already been updated, it's the *new* icons that now slide down and fade into view.
checkWinning() and isGameOver() functions are called immediately after
triggering the animations. They don't need to wait for the animations to finish, as they operate on
the final state of the data.
// ContentView.swift
// ...
                    // MARK: - Spin Button
                    Button(action: {
                        // MODIFY THE BUTTON ACTION

                        // 1. move up, disappear and change reels
                        withAnimation(Animation.easeOut(duration: 0.3)) {
                            animatingIcon = false
                            spinReels()
                        }

                        // 2. move down, appear
                        withAnimation(Animation.easeOut(duration: 0.7).delay(0.3)) {
                            animatingIcon = true
                        }

                        checkWinning()

                    }, label: {
                        Image("spin")
                            .resizable()
                            .modifier(reelImageStyle())
                    })
// ...
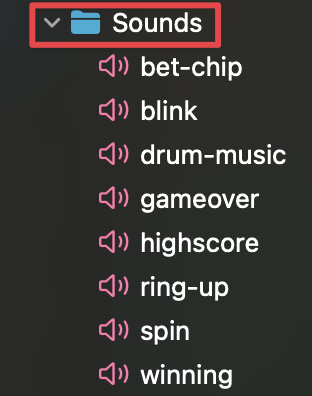
🎵 Step 10: Add Sound Files to the Project
Add Sound Files to the Project
Instruction:
- In the Xcode project navigator, create a new group (folder) named
Sounds. - Drag and drop the provided
.mp3files (bet-chip.mp3,gameover.mp3,highscore.mp3,ring-up.mp3,spin.mp3, etc.) into this newSoundsfolder. - When the "Choose options" dialog appears, make sure to check
Copy items if neededand select your app's target.
Explanation: This step adds the necessary audio assets to your app bundle so they can be accessed and played by the code we'll write in the next step. All game sound assets are available in the Asset Gallery.
🎧 Step 11: Create a Sound Player Helper
Create a Sound Player Helper
Instruction:
- Create a new group (folder) named
Helpers. - Move the existing
Modifiers.swiftfile into thisHelpersfolder. - Inside
Helpers, create a new Swift File namedPlaySound.swift. - Add the provided code to this new file.
Explanation:
This helper file contains a reusable function, playSound, that uses Apple's
AVFoundation framework to play audio files. It encapsulates the audio playing
logic, keeping our ContentView cleaner. We declare a global
audioPlayer variable to manage the audio playback.
// Create new file Helpers/PlaySound.swift
import Foundation
import AVFoundation

var audioPlayer : AVAudioPlayer?

func playSound(sound: String, type: String) {
    if let path = Bundle.main.path(forResource: sound, ofType: type) {
        do {
            audioPlayer = try AVAudioPlayer(contentsOf: URL(fileURLWithPath: path))
            audioPlayer?.play()
        } catch {
            print("ERROR: Could not find and play the sound file!")
        }
    }
}
🔊 Step 12: Integrate Sound Effects
Integrate Sound Effects into the Game
Instruction:
In ContentView.swift, import AVFoundation and call the
playSound() function at various logical points: when spinning, winning, getting a
new high score, and changing bets.
Explanation: Now we're bringing the game to life with audio feedback. Each key player action will be accompanied by a corresponding sound effect, making the experience more immersive and engaging.
// ContentView.swift
// ...
    func spinReels(){
        reels = reels.map({ _ in
            Int.random(in: 0...icons.count-1)
        })
        // ADD SOUND
        playSound(sound: "spin", type: "mp3")
    }


    // MARK: - Check Winning Logic
    func checkWinning() {
        if reels[0] == reels [1] && reels[1] == reels [2] {
            // Winning logic
            playerWins()

            if coins > highscore {
                newHighScore()
            } else {
                // ADD SOUND
                playSound(sound: "winning", type: "mp3")
            }

        } else {
// ...
    // MARK: - Highscore Logic
    func newHighScore() {
        highscore = coins
        // ADD SOUND
        playSound(sound: "highscore", type: "mp3")
    }

    // MARK: - Player Lose Logic
// ...
    // MARK: - Bet 20 Logic
    func chooseBet20(){
        betAmount=20
        isChooseBet10=false
        isChooseBet20=true
        // ADD SOUND
        playSound(sound: "bet-chip", type: "mp3")
    }
    // MARK: - Bet 10 Logic
    func chooseBet10(){
        betAmount=10
        isChooseBet10=true
        isChooseBet20=false
        // ADD SOUND
        playSound(sound: "bet-chip", type: "mp3")
    }
// ...
💀 Step 13: Implement the Game Over Feature
Implement the Game Over Feature
Instruction:
- Add a new
@StatevariableshowGameOverModaltoContentView.swift. - Create a new function
isGameOver()to check if coins are zero and set the modal state totrue. Call this function after each spin. - Create a new SwiftUI View file in the
Viewsfolder namedGameOverView.swiftand add the provided content. - In
ContentView.swift, add a.blur()modifier to the mainVStackand overlay theGameOverViewconditionally.
Explanation:
When the player runs out of coins, the game should end. The isGameOver() function
handles this logic. We then display a modal GameOverView that informs the player
and gives them an option to start a new game. The .blur() modifier on the main view
adds a nice visual effect, focusing the user's attention on the game over screen.
// Create new file Views/GameOverView.swift
import SwiftUI

struct GameOverView: View {
    @Binding var showModal: Bool
    @Binding var coins: Int

    var body: some View {
        ZStack{
            Color("ColorBlackTransparentRMIT")
                .edgesIgnoringSafeArea(.all)

            VStack{
                Text("GAME OVER")
                    .font(.system(.title, design: .rounded))
                    .fontWeight(.heavy)
                    .foregroundColor(Color.white)
                    .padding()
                    .frame(minWidth: 280, idealWidth: 280, maxWidth: 320)
                    .background(Color("ColorRedRMIT"))

                Spacer()

                VStack {
                    Image("rmit-casino-logo")
                        .resizable()
                        .scaledToFit()
                        .frame(maxHeight: 150)

                    Text("You lost all money!\nYou are not the god of gambler!\n Good luck next time!")
                        .font(.system(.body, design: .rounded))
                        .foregroundColor(Color.white)
                        .multilineTextAlignment(.center)

                    Button {
                        self.showModal = false
                        self.coins = 100
                        playSound(sound: "ring-up", type: "mp3")
                    } label: {
                        Text("New Game".uppercased())
                            .foregroundColor(Color.white)
                    }
                    .padding(.vertical,10)
                    .padding(.horizontal, 20)
                    .background(
                        Capsule()
                            .strokeBorder(lineWidth: 2)
                            .foregroundColor(Color("ColorRedRMIT"))
                    )
                }

                Spacer()
            }
            .frame(minWidth: 280, idealWidth: 280, maxWidth: 320, minHeight: 280, idealHeight: 300, maxHeight: 350, alignment: .center)
            .background(Color("ColorBlueRMIT"))
            .cornerRadius(20)
            .shadow(color: Color("ColorBlackTransparentRMIT"), radius: 15)

        }.onAppear(perform: {
            playSound(sound: "drum-music", type: "mp3")
        })
    }
}

#Preview {
    GameOverView(showModal: .constant(true), coins: .constant(100))
}
// ContentView.swift
// ...
@State var animatingIcon = true
// ADD THIS STATE
@State private var showGameOverModal = false
// MARK: - Spin Logic
// ...
// MARK: - Bet 10 Logic
func chooseBet10(){
betAmount=10
isChooseBet10=true
isChooseBet20=false
playSound(sound: "bet-chip", type: "mp3")
}
// ADD THIS FUNCTION
// MARK: - Gameover
func isGameOver() {
if coins <= 0 {
// SHOW MODAL MESSAGE OF GAME OVER
showGameOverModal = true
playSound(sound: "gameover", type: "mp3")
}
}
var body: some View {
ZStack {
// ...
// MARK: - Spin Button
Button(action: {
// ... animation code ...
checkWinning()
// ADD THIS CALL
isGameOver()
}, label: {
// ...
.padding(.horizontal, 20)
}
// ADD THESE MODIFIERS AND THE CONDITIONAL VIEW
.padding()
.frame(maxWidth: 720)
.blur(radius: showGameOverModal ? 5 : 0 , opaque: false)
if showGameOverModal {
GameOverView(showModal: $showGameOverModal, coins: $coins)
}
}
}
}
// ...
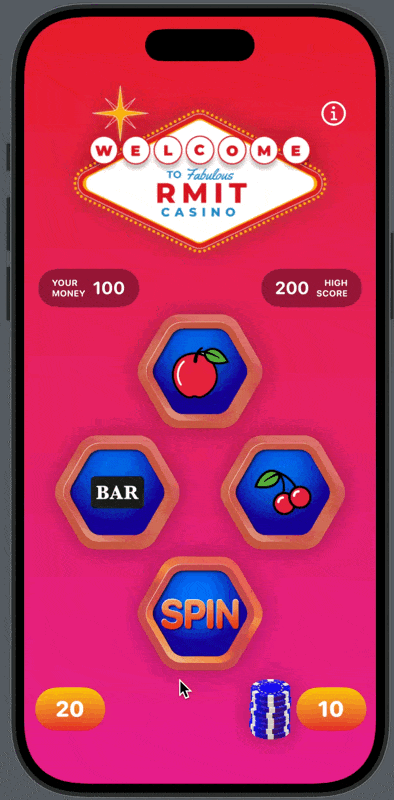
ℹ️ Step 14: Add an Information Screen
Add an Information Screen
Instruction:
- Add a new
@StatevariableshowingInfoViewtoContentView.swift. - Create a new SwiftUI View file in the
Viewsfolder namedInfoView.swiftand add the provided content. - In
ContentView.swift, add an "info" button in an.overlay()modifier on the mainVStack. - Add a
.sheet()modifier to the mainZStackinContentViewto present theInfoView.
Explanation:
A good app should provide instructions. We'll add an info button that, when tapped, presents a
"sheet" containing the InfoView. This view will explain the rules and provide some
application details. The .sheet() modifier is SwiftUI's standard way of presenting
modal content from the bottom of the screen.
// Create new file Views/InfoView.swift
import SwiftUI

struct InfoView: View {
  @Environment(\.dismiss) var dismiss

  var body: some View {
      ZStack{
          Color("ColorBlueRMIT")
          VStack(alignment: .center, spacing: 10) {
            LogoView(logoFileName: "rmit-casino-logo")

            Spacer()

            Form {
              Section(header: Text("How To Play")) {
                  Text("Just spin the reels to play.")
                  Text("Matching all icons to win.")
                  Text("The winning amount will be 10x of your betting amount.")
                  Text("You can reset the money and highscore by clicking on the button Reset.")
              }
                Section(header: Text("Application Information")) {
                    HStack {
                      Text("App Name")
                      Spacer()
                      Text("RMIT Casino")
                    }
                    HStack {
                      Text("Course")
                      Spacer()
                      Text("COSC3062")
                    }
                    HStack {
                      Text("Year Published")
                      Spacer()
                      Text("2025")
                    }
                    HStack {
                      Text("Location")
                      Spacer()
                      Text("Saigon South Campus")
                    }
              }
            }
            .font(.system(.body, design: .rounded))
          }
          .padding(.top, 40)
          .overlay(
            Button(action: {
              audioPlayer?.stop()
              dismiss()
            }) {
              Image(systemName: "xmark.circle")
                .font(.title)
            }
            .foregroundColor(.white)
            .padding(.top, 30)
            .padding(.trailing, 20),
            alignment: .topTrailing
            )
            .onAppear(perform: {
              playSound(sound: "drum-music", type: "mp3")
            })
      }

  }
}

#Preview {
    InfoView()
}
// ContentView.swift
// ...
@State var animatingIcon = true
// ADD THIS STATE
@State private var showingInfoView = false
@State private var showGameOverModal = false
// MARK: - Spin Logic
// ...
var body: some View {
ZStack {
// ...
.padding(.horizontal, 20)
}
// ADD THIS OVERLAY
.overlay(
// MARK: - INFO GAME BUTTON
Button(action: {
self.showingInfoView = true
}) {
Image(systemName: "info.circle")
.foregroundColor(.white)
}
.modifier(ButtonStyle()), // You may need to add this modifier to Modifiers.swift
alignment: .topTrailing
)
.padding()
// ...
if showGameOverModal {
GameOverView(showModal: $showGameOverModal, coins: $coins)
}
}
// ADD THIS SHEET MODIFIER
.sheet(isPresented: $showingInfoView) {
InfoView()
}
}
}// Add to Helpers/Modifiers.swift
// ...
import Foundation
import SwiftUI
struct ButtonStyle: ViewModifier {
func body(content: Content) -> some View {
content
.font(.title)
.accentColor(Color.white)
.padding()
}
}
struct ShadowModifier: ViewModifier {
// ...
💥 Step 15: Enhance User Experience with Haptic Feedback
Add Haptic Feedback on Win and Loss
Instruction:
Create a simple helper function to trigger haptic feedback and call it from the
playerWins(), newHighScore(), and playerLoses() functions
in ContentView.swift.
Explanation: Haptic feedback provides a physical sensation (like a vibration) to the user, which can make interactions feel more tangible and rewarding. SwiftUI makes it easy to trigger standard system haptics. We'll add a "success" notification for wins and an "error" notification for losses to enhance the user experience.
// ContentView.swift
// ...
    // MARK: - Player Winning Logic
    func playerWins() {
        coins += betAmount*10
        // ADD HAPTIC
        playHaptic(type: .success)
    }

    // MARK: - Highscore Logic
    func newHighScore() {
        highscore = coins
        playSound(sound: "highscore", type: "mp3")
        // ADD HAPTIC
        playHaptic(type: .success)
    }

    // MARK: - Player Lose Logic
    func playerLoses(){
        coins -= betAmount
        // ADD HAPTIC
        playHaptic(type: .error)
    }

    // ADD THIS FUNCTION
    // MARK: - Haptic Feedback
    func playHaptic(type: UINotificationFeedbackGenerator.FeedbackType) {
        let generator = UINotificationFeedbackGenerator()
        generator.notificationOccurred(type)
    }
// ...
🎉 Congratulations!
You've Done It!
Congratulations! After following all these steps, your project will have all the features of the target project, including dynamic data, game logic, betting, animation, sound, and persistent high scores.
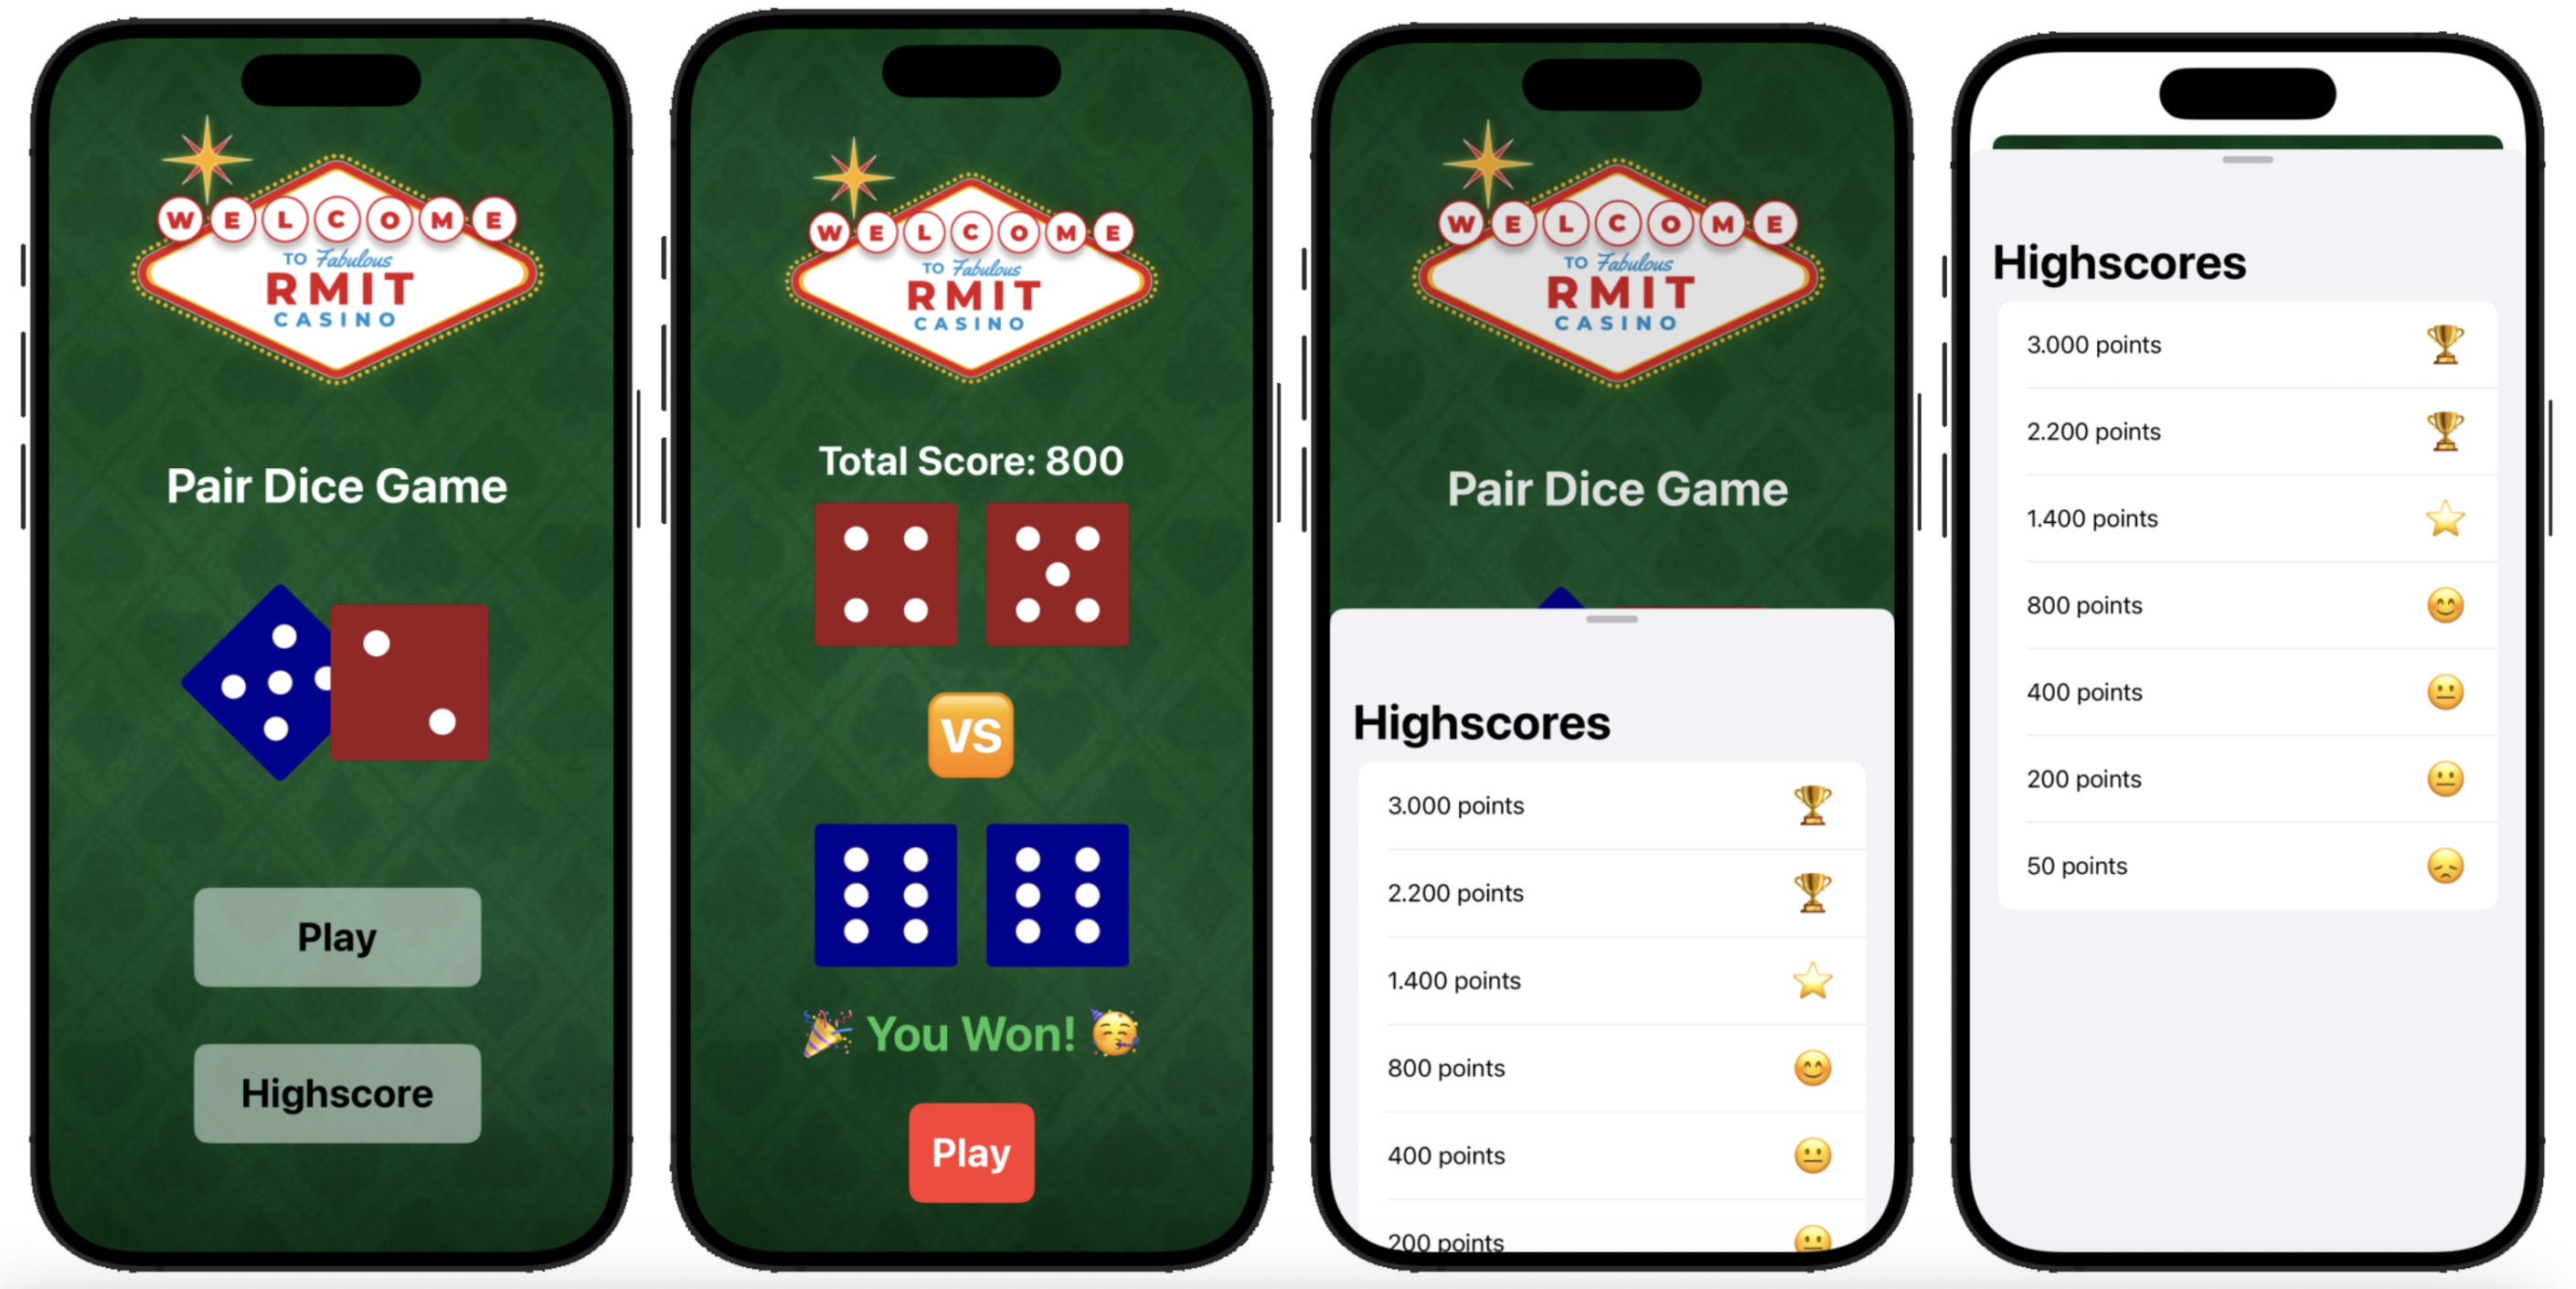
🚀 Bonus Challenge: Advanced Dice Game
Part 1: High Scores and Multiple Views ⭐
We continue to polish and improve our lite version of RMIT Casino app, the fun dice game in the previous lab. This time, we add a new features:
Three Views:
- Homepage view which displays the title of the game, two buttons:
- one “Play” button to take users to the Game view.
- one “Highscores" button to open the Highscore view which displays a list of highscores as a sheet.
Make sure the list of highscores is persistent as you relaunch the launch by using UserDefaults to store highscores as an array/list in UserDefaults.
The sheet can be shown as half height and full height using medium or large presentationDetents.
Game Rules:
- You play blue dice.
- The AI opponent plays red dice.
- At each new game, you will start with the score to be 0.
- When you press the “Play” button, dice rolls are randomized.
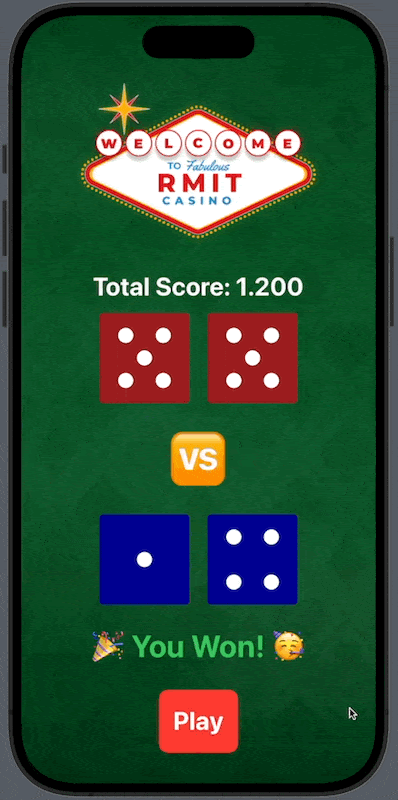
- If your total sum of dice is greater than your opponent then you will win and see the winning message like in the demo screenshot below, and add +10 points to your score. Otherwise (equal or less than), you lose and see the lost message and minus -10 points from your score.
- You will start with 100 points. A game finishes when your score reaches 0. However, the high score of that game is the highest score you have reached, not the final end score.
- So the list of high scores is the list of highest scores you have achieved so far.
Sound Effects:
- Add some sound effects when you win or you lose.
- You can select free game sound effects here:
All image assets of this dice game can be downloaded on Canvas. However you are encouraged to choose your own image assets and colorsets.
Part 2: Dice Animation ⭐⭐
Let's try to create a dice animation for our tutorial dice game. Apply what you have learn so far in this week, can you create a dice animation like so in the game:
- Start Animation: When "Play" is pressed, a timer starts with a short interval (0.1 seconds).
- Randomize Dice Values: The timer repeatedly updates dice values with random numbers (1-6) to simulate rolling.
- Control Duration: The dice animation continues for a set duration (1.5 seconds) using a timer.
- Stop Animation: The timer stops after the duration is reached, final dice values are set for the game result.
- Display Outcome: The game determines if the player won or lost, updates the score, and plays the corresponding sound effect.